Honey Rosé Plum Cobbler

Honey Rosé Plum Cobbler | Image: Laura Messersmith

Honey Rosé Plum Cobbler | Image: Laura Messersmith

I adore fall and the smoky scent of leaves, the crisp brightness, the enjoyment of cool cheeks and a cozy sweater. I anticipate the energy change from the hot laziness of summer, but I also sort of dread it – the beginning of the all too rapid transition into full-on winter. Slushy side walks, cold fingers, wearing my duck boots nearly 24/7 – no thanks.

But let’s focus on the here and now – the blazing blue skies the last lingering summer produce. Who doesn’t need a great late-summer early-fall recipe to take advantage of the glorious wealth of plums that hit the markets in September and generously hang on until October? Definitely not a delicate berry, but a bit more tender-hearted than the sturdy apples and pears to come in oh like t-minus 1 week (not that I’m really complaining.)

Honey Rosé Plum Cobbler | Image: Laura Messersmith

Honey Rosé Plum Cobbler | Image: Laura Messersmith

Plums have the depth to stand proudly alongside other robust flavors and add their tart sweetness to the dry rosé. This cobbler topped with buttery dough – is waiting to grace your dinner table.

Honey-Rosé Plum Cobbler (serves 6)

Ingredients:
1 3/4 cups, plus 2 tablespoons all-purpose flour, divided
1/4 cup sugar
2 teaspoons baking powder
1/4 teaspoon salt
1/2 cup, plus 2 tablespoons whole milk, divided
1/3 cup olive oil
2/3 cup dry rosé wine
1/3 cup clover honey
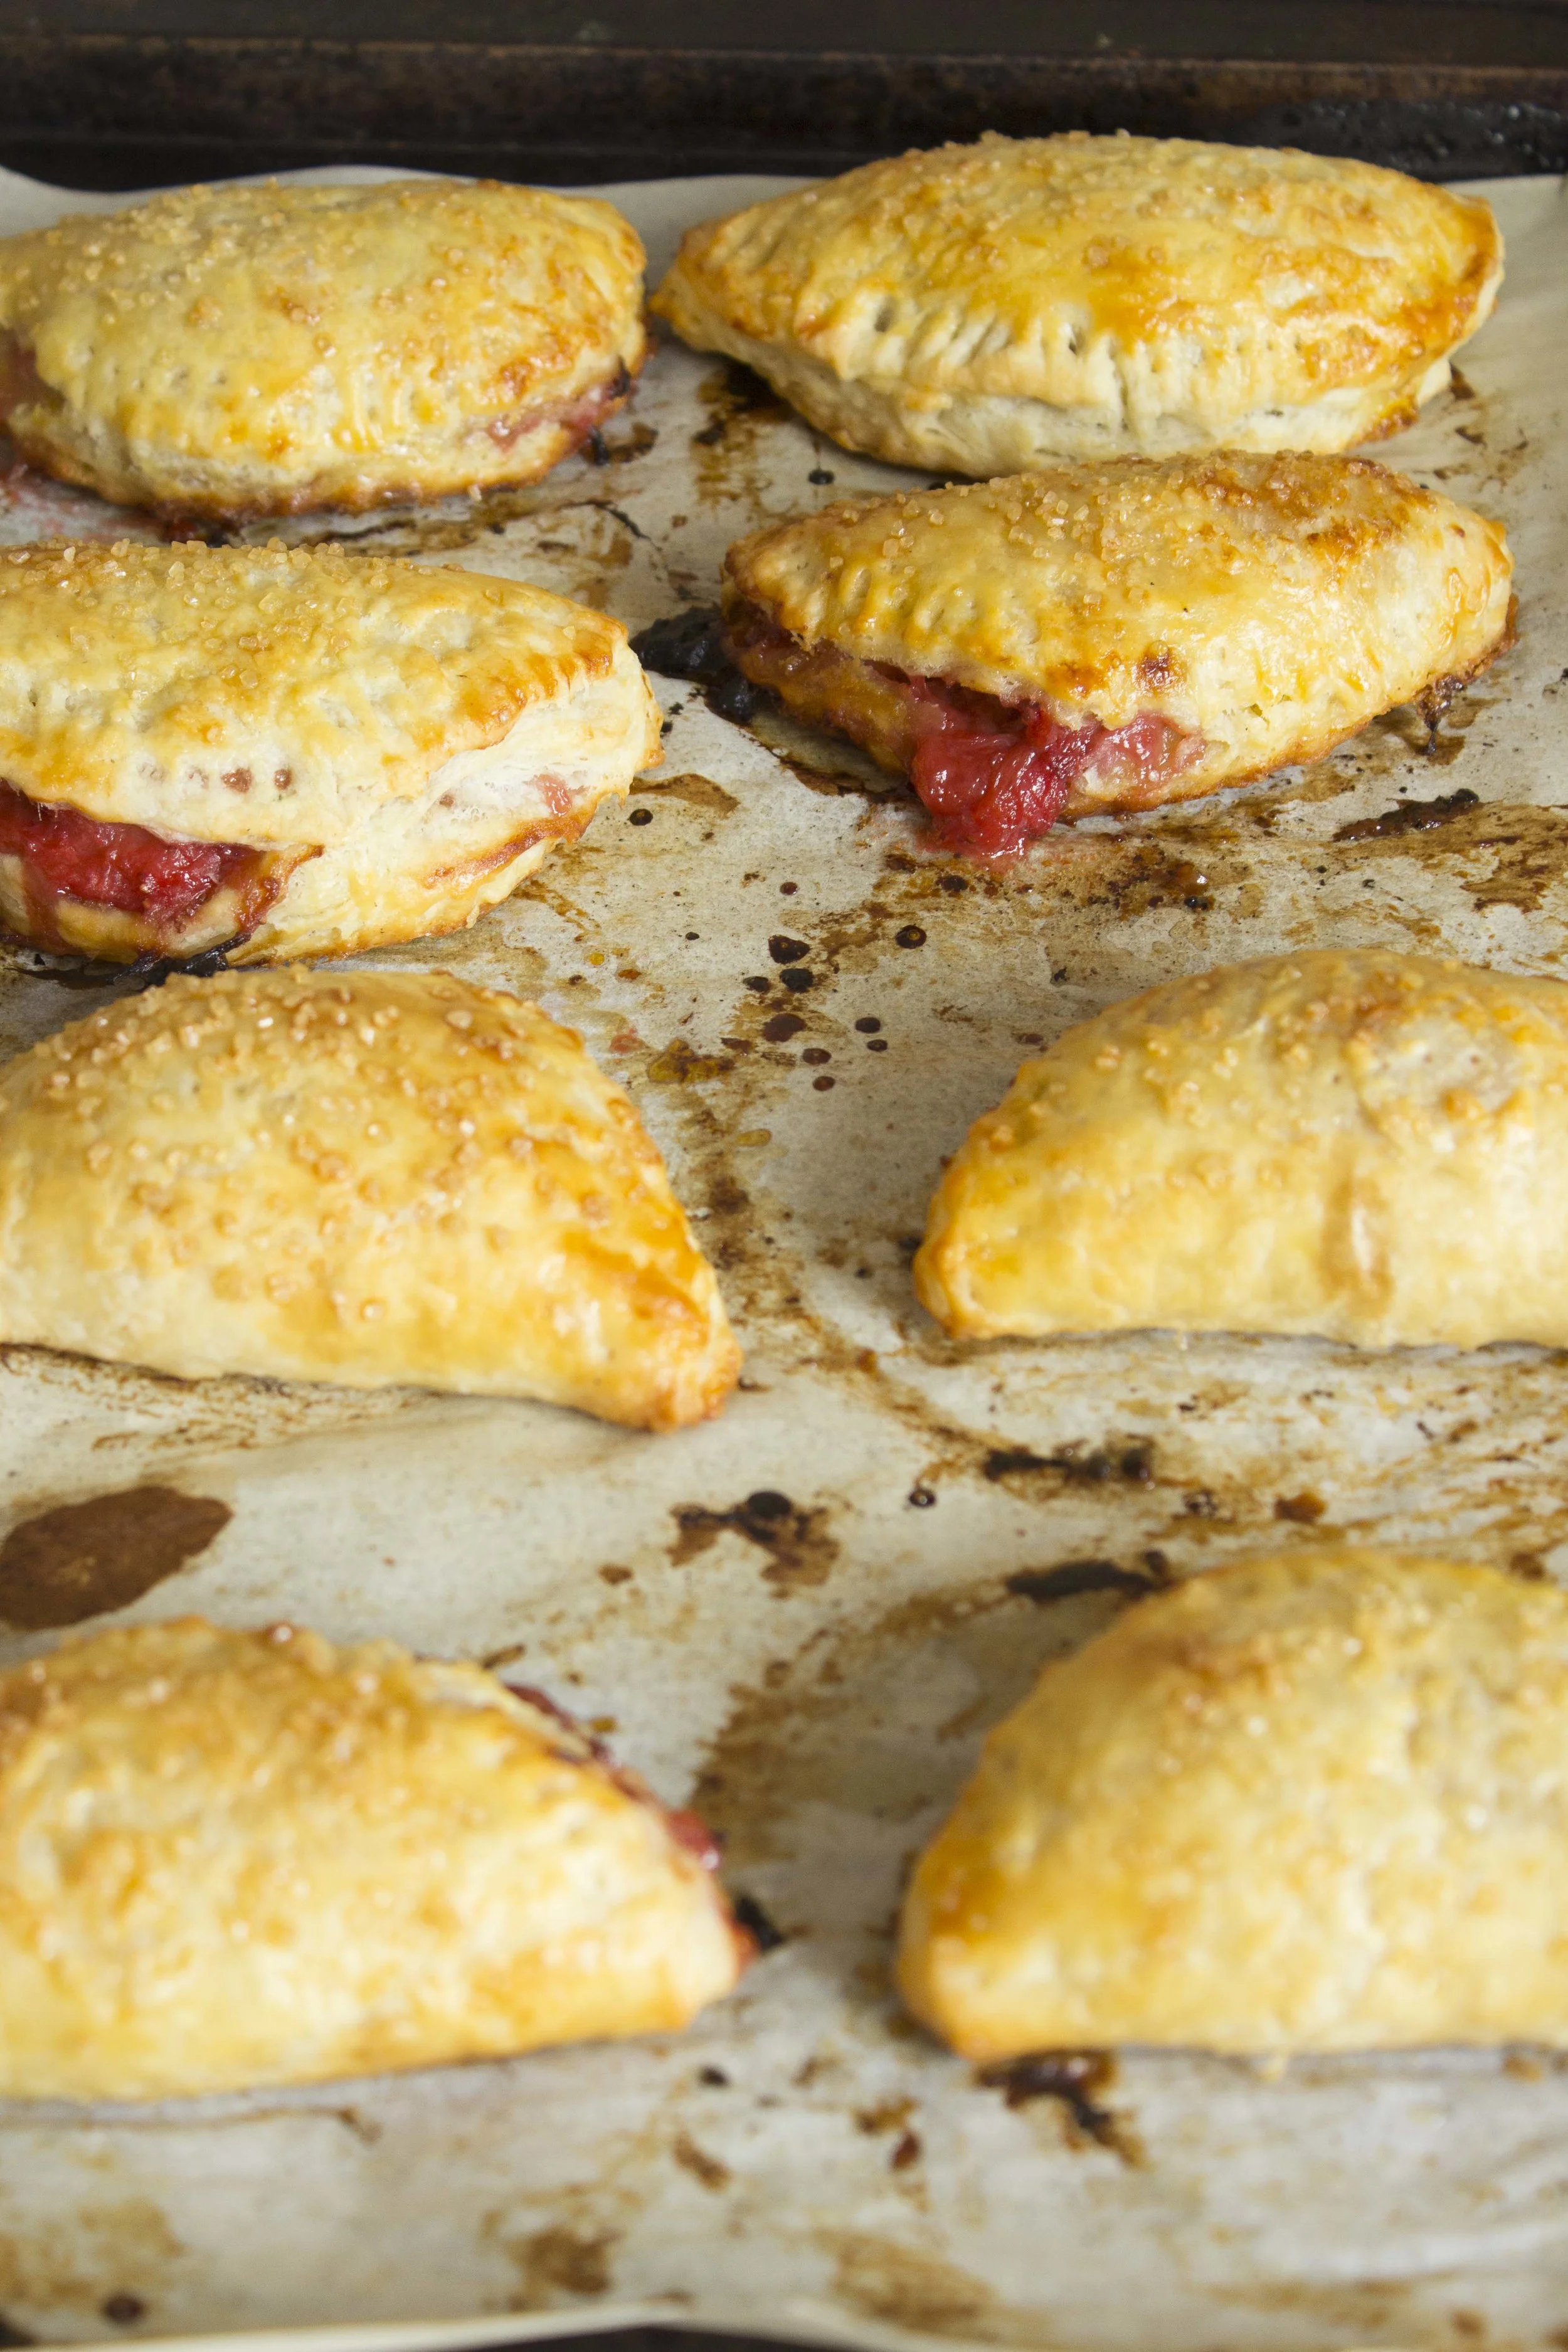
2 1/2 pounds assorted plums, pitted and cut into 8 wedges each
2 tablespoons coarse sugar, aka sugar in the raw

Optional for serving: ice cream or whipped cream

Instructions:
Preheat oven to 400 degrees F. Brush 6 oven-safe ramekins with softened butter.

For the biscuits, combine the 1 3/4 cups flour, 1/4 cup sugar, baking powder, and salt in a medium bowl. Add 1/2 cup milk and olive oil to the flour mixture. Stir to combine. Cover with plastic wrap, and set aside.

For filling, combine the wine, honey in an extra-large skillet whisk in remaining 2 tablespoons flour. Stir in the plums. Cook and stir over medium-high heat about 8 minutes or until thickened and bubbly. Remove from heat; keep warm.

Unwrap dough and roll out to 1/2-inch thickness on a floured surface. Cut into rounds using a 1-inch round cutter. Divide plums among the ramekins filling nearly to the tops. Arrange the biscuits over the filling, slightly overlapping as needed. Brush with the remaining 2 tablespoons of milk and sprinkle the biscuits with the coarse sugar.

Bake for 15-20 minutes or until biscuits are golden. Place a baking sheet below the dish to catch an drips during baking.

Remove from oven and let stand 30 minutes before serving with a scoop of ice cream or whipped cream.

Adapted and lightly re-written from Better Homes and Gardens’ Honey Rosé Plum Cobbler by David Bonom.

Honey Rosé Plum Cobbler | Image: Laura Messersmith

Honey Rosé Plum Cobbler | Image: Laura Messersmith

Small Kitchen Friendly?
I used 6 (7 ounce) oven-safe ramekins, pastry brush, medium mixing bowl, measuring cups & spoons, liquid measuring cup, spatula, large skillet, whisk, chef’s knife, medium cutting board, small fluted biscuit cutter, and rimmed baking sheet.

Honey Rosé Plum Cobbler | Image: Laura Messersmith

Honey Rosé Plum Cobbler | Image: Laura Messersmith

Mini Pavlovas with Roasted Rhubarb and Pistachios

Mini Pavlovas with Roasted Rhubarb and Pistachios | Image: Laura Messersmith

Mini Pavlovas with Roasted Rhubarb and Pistachios | Image: Laura Messersmith

I was so jazzed when one of my favorite bloggers, Yossy Arefi of Apt 2B Baking Co. published a cookbook this past spring, and yeah I totally went to a signing at Union Square Farmer’s Market just to have my copy autographed. Her inventive flavor combinations, unfussy baking style, and gorgeous photography never fail to inspire me in the kitchen. I’ve been slowly working my way through Sweeter Off the Vine, a book that focuses on seasonal fruit-focused recipes, and couldn’t wait to make the Pavlova with Rhubarb.

Mini Pavlovas with Roasted Rhubarb and Pistachios | Image: Laura Messersmith

Mini Pavlovas with Roasted Rhubarb and Pistachios | Image: Laura Messersmith

I’m a bit late to the party since rhubarb season is coming to an end, but if you have a few stalks left that need a great opportunity to shine or a have been stockpiling it like I have then this is for you. A showstopper that does take a few steps, but is so worth it when the sweet crisp meringue, cool smooth whipped cream, and tart rhubarb hit your palate. I liked the twist of making them individual portions a little crunch from toasted pistachios – and who can resist that pale green color against the fuchsia pink.

Mini Pavlovas with Roasted Rhubarb and Pistachios | Image: Laura Messersmith

Mini Pavlovas with Roasted Rhubarb and Pistachios | Image: Laura Messersmith

Mini Pavlovas with Rhubarb and Pistachios (yield 12 servings)

Meringue Ingredients:
6 large egg whites, room temperature
1 1/2 cups granulated sugar
1 tablespoon cornstarch
1 1/2 teaspoon white wine vinegar
3/4 teaspoon vanilla extract
kosher salt

Topping Ingredients:
1 pound rhubarb, trimmed and sliced on the bias into 2-inch pieces
1/3 cup granulated sugar
3 tablespoons fresh lemon juice
1 teaspoon vanilla extract
1 1/2 cups heavy cream
2 tablespoons confectioner’s sugar
1/2 cup roasted unsalted pistachios, chopped

Meringue Instructions:
Preheat the oven to 350 degrees F.

In a small bowl, stir together 1 1/2 cups of sugar with the cornstarch. Then, in the bowl of a stand mixer with the wire whisk attachment or (large mixing bowl with a hand mixer) beat the egg whites with a pinch of salt on high speed until firm, 1-2 minutes. With the mixer still on high, slowly add the sugar mixture a little at a time.

The mixture will start off looking foamy and frothy, then turn white and look closer to soft whipped cream, eventually resembling melted marshmallow fluff. Continue to beat on high until the meringue is solid white and forms shiny, firm peaks, about 12-15 minutes. The true test? Turn off the mixer and once the whisk has stopped spinning, remove the whisk from the meringue – both the meringue in the bowl and the meringue on the should form matching points like snowy mountain tops.

Once the meringue is ready sprinkle 3/4 teaspoon vanilla extract and the vinegar on top and fold in gently with a rubber spatula to combine.

With a pencil, draw 6 circles approximately 4 inches in diameter (think the size of a water glass) on each of the parchment-lined sheets and turn over. You’ll still be able to see the guides, but you won’t get pencil markings on your meringue!

Spoon the meringue onto the baking parchment into the delineated circles, and spread and smooth to fill. Use the back of the spoon to make an indentation in the center and form a shallow bowl – that’s where the whipped cream and fruit will go later.

Put the sheet pans into the oven, immediately turn it down to 300 degrees F, and bake for 30 minutes rotating the sheets halfway through the baking time. Turn the oven off and leave them in for another 30 minutes with the oven door closed. The remove the sheets from the oven and slide the parchment paper and meringues over to wire racks to cool. Once fully cooled, meringues can be stored in an airtight container for 2-3 days.

Topping Instructions:
For the rhubarb topping, preheat oven to 375 degrees F. Combine rhubarb, remaining 1/3 cup sugar, 3 tablespoons lemon juice, and a pinch of salt in a 9-by-13-inch glass baking dish. Bake until just tender, about 10 to 12 minutes, spooning juices over halfway through.

Carefully transfer rhubarb pieces (they will be quite soft) to a bowl and reserve juices. Let cool completely.

Just before serving, beat together heavy cream and 1 teaspoon vanilla extract until soft peaks form.

Place meringues on a plated and fill each one with whipped cream. Top the whipped cream with the poached rhubarb, and garnish with pistachios. Spoon rhubarb juices over the pavlova, and serve immediately.

Inspired by and written with reference to Yossy Arefi’s Rhubarb Pavlovas in Sweeter Off the Vine (pg. 27), pistachio component from Martha Stewart’s Pavlova with Rhubarb and Pistachios, and assistance with miniaturization from Nigella Lawson’s Mini Pavlovas with Berries. Thank you, Ladies.

Mini Pavlovas with Roasted Rhubarb and Pistachios | Image: Laura Messersmith

Mini Pavlovas with Roasted Rhubarb and Pistachios | Image: Laura Messersmith

Small Kitchen Friendly?
Yes! I used a stand mixer (but a handheld would work just as well), medium mixing bowl, spatula, two rimmed baking sheets, chef’s knife, a medium cutting board, glass baking dish, tongs, measuring cups and spoons.

Strawberry Rhubarb Hand Pies

Strawberry Rhubarb Hand Pies | Image: Laura Messersmith

Strawberry Rhubarb Hand Pies | Image: Laura Messersmith

It should come as no surprise that I’m pretty obsessed with pie – both the making of pie (and all the adventures that ensue) and of course the eating of pie (the best part.) As peak summer produce season draws closer and closer I’ve been dog-earring my copy of Four and Twenty Blackbird’s and plotting my next pie adventure like a cartoon villain. Not a terribly villainous villain, unless bringing dessert wherever I go in the name of “sharing” is considered wicked. I tried the sisters Elsen’s pie crust recipe this time around – the use of cider vinegar was intriguing – and since I’ve always been a fan of all-butter pie crusts this one is my new go-to.

The filling recipe by Chef Hugh Acheson, my favorite Top Chef guest judge, combines strawberry and rhubarb with just a hint of spice from the black pepper. Strawberry and rhubarb come into season around the same time and are a classic example of “what grows together goes together.” A perfect blend of sweet and tangy all in a portable, buttery package. These hand pies are made to be shared; preferably while picnicking on a sunny day in the park.

Strawberry Rhubarb Hand Pies | Image: Laura Messersmith

Strawberry Rhubarb Hand Pies | Image: Laura Messersmith

Strawberry Rhubarb Hand Pies (yield 16 pies)

All-Butter Crust Ingredients:
2 1/2 cups unbleached all-purpose flour
1 teaspoon kosher salt
1 tablespoon granulated sugar
1/2 pound (2 sticks) cold unsalted butter, cut into 1/2-inch pieces
1 cup cold water
1/4 cup cider vinegar
1 cup ice cubes

Crust Instructions:
Mix the flour, salt, and sugar together in a large bowl. Add the diced butter pieces and toss lightly to coat with the flour mixture. With a pastry blender, cut the butter into the flour mixture, working quickly until mostly pea-size pieces of butter remain. Take care not to over blend.

In a large measuring cup, combine the water, cider vinegar, and ice. Sprinkle 2 tablespoons of the ice water mixture over the butter and flour, and blend with a rubber spatula until it is fully incorporated.

Continue adding more of the ice water mixture, 1 to 2 tablespoons at a time, using the spatula or your hands (or both) to mix until the dough just comes together in a ball, with some dry bits remaining.

Squeeze and pinch with your fingertips to bring all the dough together, sprinkling dry bits with more small drops of the ice water mixture, if necessary, to combine. Discard any remaining ice water mixture.

Shape the dough into a flat disc, wrap in plastic, and refrigerate for at least 1 hour, preferably overnight, to give the flour time to absorb the moisture and relax. Wrapped tightly, the dough can be refrigerated for 3 days or frozen for 1 month.

Filling Ingredients:
1 tablespoon unsalted butter
7 ounces strawberries, hulled and roughly chopped
5 ounces rhubarb, peeled and roughly chopped
3 tablespoons sugar
1⁄2 tablespoon white wine vinegar
1⁄4 teaspoon freshly ground black pepper
1⁄4 teaspoon lemon juice
1 pinch kosher salt
1 egg
2 tablespoons sugar in the raw

Filling Instructions:
In a medium saucepan, melt the butter over medium heat. Add the strawberries and rhubarb and cook until soft and jam-like, 6–8 minutes. Stir in sugar, vinegar, pepper, lemon juice, and salt; cook 3 minutes more until the mixture thickens. Cool to room temperature, then cover and chill at least 30 minutes before using.

Assemble and bake the pies: On a lightly floured surface, roll dough 1⁄4 inch thick and use a large, round biscuit cutter to cut out 14 rounds. Gather the scraps and re-roll to create the final 2 rounds.

Lay the disks of dough out on parchment paper-lined baking sheets. Place 2 tablespoons filling in center of each disk of dough. Whisk the egg in a bowl, brush edges of the dough with the egg wash and fold in half over the filling. Press the edges together and crimp with a fork to seal. Chill 20 minutes.

Heat oven to 400 degrees F. Using a fork, prick tops of pies; brush tops with the remaining beaten egg and sprinkle with coarse sugar. Bake pies until golden, about 20 minutes; let cool slightly before serving.

Re-written and very lightly adapted from All Butter Pie Crust by Four and Twenty Blackbirds (pg. 207) and Strawberry Rhubarb Hand Pies by Chef Hugh Acheson via Saveur.

Strawberry Rhubarb Hand Pies | Image: Laura Messersmith

Strawberry Rhubarb Hand Pies | Image: Laura Messersmith

Small Kitchen Friendly?
Surprisingly, yes! I used a large mixing bowl, 2 quart sauce pan, 2 rimmed baking sheets, pastry cutter, rubber spatula, rolling pin, 4 inch fluted biscuit cutter, 2 tablespoon cookie scoop, pastry brush, dry and liquid measuring cups and spoons, and parchment paper.

Strawberry Rhubarb Hand Pies | Image: Laura Messersmith

Strawberry Rhubarb Hand Pies | Image: Laura Messersmith

Browned Butter Chocolate Chip Cookies

Browned Butter Chocolate Chip Cookie | Image: Laura Messersmith

Browned Butter Chocolate Chip Cookie | Image: Laura Messersmith

It’s not overstating a fact to call the chocolate chip cookie iconic and there’s a reason they’re the first to go from any conference room buffet leaving only decoy oatmeal raisin and lackluster plain sugar to be last picks. Chocolate chip cookies are flipping delicious – sweet, a bit salty, and if the baker isn’t stingy with the chocolate pieces they can be downright decadent (hello fellow Levain devotees.)

I started my baking career with the classic yellow-bag Toll House recipe only daring to add an extra half teaspoon of vanilla or quarter cup of chips for fear of risking cookie meltdown. Today, I’m proud to say that while that version remains the bedrock of my kitchen memories I’ve found the courage to branch out a bit and explore.

There can never be enough chocolate chip cookies which means the search for the perfect recipe is ongoing. First with a Tara O’Brady’s recipe that toyed with both the brown sugar:white sugar ratio and included melted butter.* Now with this challenger from the very talented Joy Wilson, better known as Joy The Baker, we’re trying browned butter and now a third sugar ratio. All in the name of science, of course.

*Since I never plan quite far enough ahead; room temperature butter is always my downfall, so this was a major development.

Browned Butter Chocolate Chip Cookie | Image: Laura Messersmith

Browned Butter Chocolate Chip Cookie | Image: Laura Messersmith

Browned Butter Chocolate Chip Cookies (yield: about 3 dozen cookies)

Ingredients:
1 cup (2 sticks) room temperature unsalted butter, divided
1 cup light brown sugar, packed
2 teaspoons vanilla extract
1 teaspoon molasses
1/2 cup granulated sugar
1 large egg
1 large egg yolk
2 1/4 cups all-purpose flour
1 teaspoon kosher salt
1 teaspoon baking soda
1 1/2 cups roughly chopped bittersweet chocolate chips
flaked sea salt, to sprinkle on top

Instructions:
Line two rimmed baking sheets with parchment paper and set aside.

Place half the butter (1 stick) in a medium heavy-bottomed skillet; stainless steel or light colored will help you track the progress of the butter more easily. Melt the butter over medium-low heat, swirling the pan occasionally. The butter will foam as it cooks, and start to crackle and pop. Once the crackling stops, keep a close watch, continuing to swirl the pan often. The butter will start to smell nutty, and brown bits will form in the bottom, about 5-7 minutes. Once the bits are the color of wildflower honey remove from the heat and immediately pour it into a small bowl, bits and all. This will stop the butter from cooking and burning. Set aside to cool for 20 minutes.

Beat the remaining 1 stick room temperature butter and brown sugar together with an electric mixer for 3 to 5 minutes, until the mixture is very smooth. Next, beat in the vanilla extract and molasses.

Pour the cooled brown butter into the bowl, along with the granulated sugar. Beat for 2 minutes, until smooth; the mixture will lighten to the color of pale sand and become fluffy. Add the egg and egg yolk, and beat for one more minute.

Sift the flour, salt, and baking soda into the butter mixture, beating on low speed just until everything is incorporated. Use a spatula to fold in the chocolate chips by hand and finish incorporating all of the dry ingredients.

Turn the dough out onto a piece of parchment paper, waxed paper, or plastic wrap. Flatten it slightly into a thick disk, and refrigerate for at least 30 minutes. About 15 minutes before you’re ready to begin baking, place racks in the center and upper third of the oven and preheat your oven to 350°F.

Break the dough up into equal pieces – about 2 tablespoons worth - and roll into balls between your hands. Place the balls of dough on the prepared baking sheets leaving 2-inches of space between them so they have room to spread as they bake.

Sprinkle the top of the cookies with flaked sea salt – according to your taste**.

Bake the cookies in the pre-heated oven for 12 to 15 minutes, rotating the sheet pan halfway through, until they’re golden brown. Remove from the oven, and allow the cookies to cool on the baking sheet (5 minutes or so) before moving them.

Serve warm; or cool completely, and store airtight at room temperature for several days. For longer storage, wrap well and freeze.

**Note on Sea Salt: I made these cookies both with and without the sprinkling of sea salt on top and found that without it they were a little under-seasoned. If you don’t plan to use it then I’d add a bit salt more to the dough itself to keep the cookies from tasting flat.

Lightly adapted and rewritten from Joy the Baker’s The Best Brown Butter Chocolate Chip Cookies.

Browned Butter Chocolate Chip Cookie | Image: Laura Messersmith

Browned Butter Chocolate Chip Cookie | Image: Laura Messersmith

Small Kitchen Friendly?
For a cookie recipe, yes. I used one large mixing bowl, medium stainless steel skillet, an electric hand mixer, two rimmed baking sheets, mesh sieve (optional), measuring cups and spoons, a rubber spatula, metal spatula, small cutting board and a chef’s knife.

The Verdict:
How could these cookies possibly be anything other than AMAZING? Normally I resist trends like sprinkling sea salt on everything or constantly browning butter, but in this case these little additions to the process offer so much flavor and depth that it would be miserly to keep them from you. I baked a batch when a friend was visiting from out of town and after a bite or two I started to wonder whether we shouldn’t have just skipped the whole dinner business and gone straight to dessert. Well done, Ms. Wilson.

Browned Butter Chocolate Chip Cookie | Image: Laura Messersmith

Browned Butter Chocolate Chip Cookie | Image: Laura Messersmith